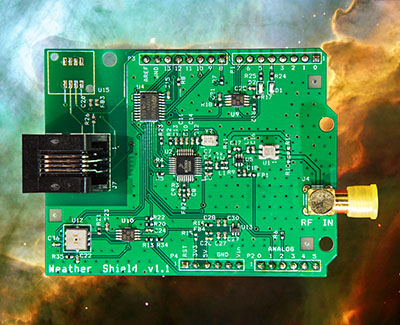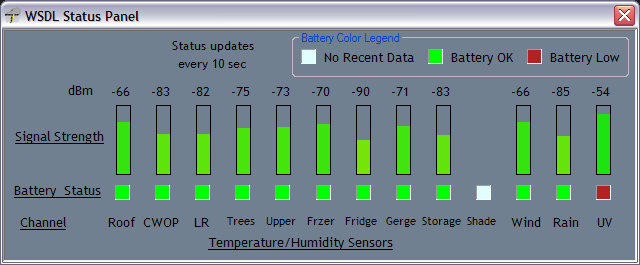
Pictured above, the second version of the shield is a more advanced surface mount (SMT) design built with a custom manufactured printed circuit board. It uses the same barometer and temperature/humidity sensor as the version 1 shield, but the receiver is completely different. The new receiver design has excellent sensitivity plus the ability to measure the approximate signal strength of all your sensors. Signal strength measurement is supported by WSDL as shown below.

This version of the WxShield can also decode OS RF protocol version 1.0 signals. This is a challenge because those older sensors send data very slowly and the version 1.0 WxShield gets confused by the slow signals. As far as we know, there is only one type of sensor which uses OS RF protocol version 1.0, and it is a temperature-only unit.
This is an open-source hardware project. Schematics and CAD files are available so that anyone can build one of these shields themselves. You can even build these and offer them for sale at a profit if so desired.
Update March, 2015: Unfortunately, two parts on the WxShield version 2 design are now obsolete (the Freescale receiver IC and the Bosch BMP085 barometer). Work is underway to create a new design with replacement parts.
Building this version of the shield requires a significantly higher level of skill at electronics assembly. You will also need to order the printed circuit boards from a manufacturing company that accepts RS274X gerber CAD files (e.g. Pad2Pad, PCB Express or SeeedStudio -- and there are many more).
The other option is to pay a company which does surface mount assembly to install all of the parts onto the PC board. These companies offer complete turnkey service -- they will even purchase the parts.
Computer-Aided Design (or "CAD") files are available for download on the download page. The file named WxShield-V2-CAD.zip contains everything you'll need to build this version of the shield.
So what good are CAD files? You can use them to order custom printed circuit boards (PCBs) and then either install the parts yourself or pay an assembly house to install them for you. The prices associated with this are perhaps a bit high for a quantity of one or two, but if a group of ten or more folks can go in on a group purchase, the price becomes a lot more reasonable.
The design includes several 0402-size parts, so manual assembly will probably require a stereo microscope, or a very good set of eyes and a head-mounted magnifier.
If you purchase an Arduino processor board, it does not come with the necessary software installed. Detailed instructions for building the software and downloading it to the Duemilanove/Uno is available here. This is a fairly simple process and should not be too difficult for non-programmers.
The Arduino source code is also available on the download page.

